CSS Tables
To style tables with CSS use the following properties: table color,collapse borders,table width and height, table text alignment, table padding. See examples.
Default browser-rendered HTML tables are plain: thin double borders, cramped cells, and no visual separation between rows. CSS turns them into readable, scannable data displays. This chapter walks through the properties that matter for tables — borders, spacing, alignment, and row styling — and ends with patterns you will reach for again and again: dividers, hover highlighting, zebra striping, and horizontal scrolling on small screens.
Every example below is a complete, runnable page, so you can open it, tweak a value, and see the effect immediately.
Table Styling Properties
Here are the CSS properties used to style a table. The background-color and color properties set the background and text colors, respectively. The border-collapse property collapses table borders. The text-align property sets horizontal text alignment. Additionally, you can use height, width, and padding for layout adjustments.
Example of styling a table:
Styling html tables example
<!DOCTYPE html>
<html>
  <head>
    <title>Title of the document</title>
    <style>
      table {
        width: 100%;
        border-collapse: collapse;
      }
      table,
      th,
      td {
        border: 1px solid black;
      }
      thead {
        background-color: #1c87c9;
        color: #ffffff;
      }
      th {
        text-align: center;
        height: 50px;
      }
      tbody tr:nth-child(odd) {
        background: #ffffff;
      }
      tbody tr:nth-child(even) {
        background: #f4f4f4;
      }
    </style>
  </head>
  <body>
    <table>
      <thead>
        <tr>
          <th>Heading</th>
          <th>Heading</th>
        </tr>
      </thead>
      <tbody>
        <tr>
          <td>Some text</td>
          <td>Some text</td>
        </tr>
        <tr>
          <td>Some text</td>
          <td>Some text</td>
        </tr>
        <tr>
          <td>Some text</td>
          <td>Some text</td>
        </tr>
        <tr>
          <td>Some text</td>
          <td>Some text</td>
        </tr>
      </tbody>
    </table>
  </body>
</html>Result
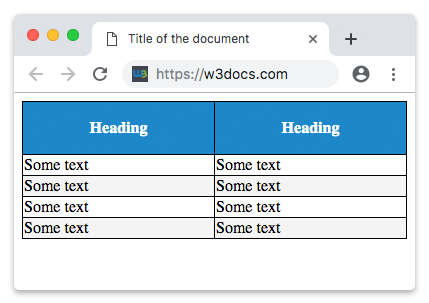
Let's explain the above code.
As you can see, our table has two main sections: the <thead> section for headings and the <tbody> section for the data rows. The table uses black borders, applied via the border property. You can use any color and border style you prefer.
Table color
The header row (<thead>) is blue with white text. The blue fill comes from the background-color property, and the white text from the color property — both applied to the thead selector so every heading cell inside it inherits them. The body cells fall back to the page's default black text on a white (or zebra-striped) background.
Collapse Borders
By default a table draws two borders between adjacent cells — one for each cell — which produces a visible gap and a doubled line. The border-collapse property controls this:
border-collapse: separate(the default) keeps each cell's borders distinct.border-collapse: collapsemerges adjacent borders into a single line, giving the clean, grid-like look used in every example on this page.
You almost always want collapse for data tables.
Table Width and Height
Use width on the table selector to control how much horizontal space the table takes — width: 100% makes it fill its container, which is the most common choice. Use height on th (or td) to give rows breathing room. Both accept pixels (50px) for a fixed size or percentages (100%) for a size relative to the parent. Note that a percentage height only works if the parent has a known height, so fixed values are more reliable for rows.
Table Text Alignment
The text-align property sets the horizontal alignment of cell content. Browsers default <th> text to center and <td> text to left, so you only set text-align when you want to override that — for example, text-align: center on th to keep headings centered, or text-align: right to line up numeric columns by their digits. The next section shows a full example.
Table Padding
To control the space between the border and content in a table, use the padding property on <td> and <th> elements:
Html tables padding
td, th {
  padding: 15px;
}Horizontal alignment with the text-align property
With the help of the CSS text-align property, you can set the horizontal alignment of the content in <th> or <td>.
By default, the content of <td> elements are aligned to the left and the content of the <th> elements are aligned to the center. In the example below, the content of <th> and <td> elements is aligned to the right:
Example of aligning the content of <th> and <td> elements to the right:
Example of aligning the content of <th> and <td> elements to the right
<!DOCTYPE html>
<html>
  <head>
    <title>Title of the document</title>
    <style>
      table,
      td,
      th {
        border: 1px solid black;
      }
      table {
        border-collapse: collapse;
        width: 100%;
      }
      th,
      td {
       text-align: right;
      }
    </style>
  </head>
  <body>
    <h2>Horizontal alignment example</h2>
    <table>
      <thead>
        <tr>
          <th>Firstname</th>
          <th>Lastname</th>
          <th>Money</th>
        </tr>
      </thead>
      <tbody>
        <tr>
          <td>Sherlock</td>
          <td>Holmes</td>
          <td>$200</td>
        </tr>
        <tr>
          <td>John</td>
          <td>Watson</td>
          <td>$250</td>
        </tr>
        <tr>
          <td>Mary</td>
          <td>Whatson</td>
          <td>$500</td>
        </tr>
      </tbody>
    </table>
  </body>
</html>Vertical alignment with the vertical-align property
Using the CSS vertical-align property, you can set the vertical alignment of the content in <th> or <td>.
By default, the content in both <th> and <td> elements is vertically aligned to middle.
In the example below, the content of <td> elements is vertically aligned to bottom:
Example of the vertical alignment of <td> elements’ content to bottom:
<!DOCTYPE html>
<html>
  <head>
    <style>
      table,
      td,
      th {
        border: 1px solid black;
      }
      table {
        border-collapse: collapse;
        width: 100%;
      }
      td {
        height: 50px;
        vertical-align: bottom;
        text-align: right;
        padding-right: 10px;
      }
    </style>
  </head>
  <body>
    <h2>Vertical alignment example</h2>
    <table>
      <thead>
        <tr>
          <th>Firstname</th>
          <th>Lastname</th>
          <th>Money</th>
        </tr>
      </thead>
      <tbody>
        <tr>
          <td>Sherlock</td>
          <td>Holmes</td>
          <td>$300</td>
        </tr>
        <tr>
          <td>John</td>
          <td>Watson</td>
          <td>$250</td>
        </tr>
        <tr>
          <td>Mary</td>
          <td>Watson</td>
          <td>$500</td>
        </tr>
      </tbody>
    </table>
  </body>
</html>Horizontal dividers
By adding the CSS border-bottom property to <td> and <th> elements, you will create horizontal dividers.
Example of creating horizontal dividers:
<!DOCTYPE html>
<html>
  <head>
    <title>Title of the document</title>
    <style>
      table {
        border-collapse: collapse;
        width: 100%;
      }
      th,
      td {
        padding: 10px;
        text-align: left;
        border-bottom: 1px solid #cccccc;
      }
    </style>
  </head>
  <body>
    <h2>Horizontal dividers example</h2>
    <table>
      <thead>
        <tr>
          <th>Firstname</th>
          <th>Lastname</th>
          <th>Money</th>
        </tr>
      </thead>
      <tbody>
        <tr>
          <td>Sherlock</td>
          <td>Holmes</td>
          <td>$200</td>
        </tr>
        <tr>
          <td>John</td>
          <td>Watson</td>
          <td>$350</td>
        </tr>
        <tr>
          <td>Mary</td>
          <td>Watson</td>
          <td>$500</td>
        </tr>
      </tbody>
    </table>
  </body>
</html>Hoverable tables
Using the CSS :hover selector on <tr> element, will make the table hoverable.
Example of creating a hoverable table:
<!DOCTYPE html>
<html>
  <head>
    <title>Title of the document</title>
    <style>
      table {
        border-collapse: collapse;
        width: 100%;
      }
      tr {
        background-color: #f5f5f5;
      }
      th,
      td {
        padding: 15px;
        text-align: left;
        border-bottom: 1px solid #ccc;
      }
      tr:hover {
        background-color: #cdcdcd;
      }
    </style>
  </head>
  <body>
    <h2>Hoverable table example</h2>
    <table>
      <thead>
        <tr>
          <th>First Name</th>
          <th>Last Name</th>
          <th>Money</th>
        </tr>
      </thead>
      <tbody>
        <tr>
          <td>Sherlock</td>
          <td>Holmes</td>
          <td>$200</td>
        </tr>
        <tr>
          <td>John</td>
          <td>Watson</td>
          <td>$350</td>
        </tr>
        <tr>
          <td>Mary</td>
          <td>Watson</td>
          <td>$500</td>
        </tr>
      </tbody>
    </table>
  </body>
</html>Zebra-striped table
Using the nth-child() selector and adding the CSS background-color property to the odd (even) table rows, you can create a zebra-striped table.
Example of creating a zebra striped table:
<!DOCTYPE html>
<html>
  <head>
    <title>Title of the document</title>
    <style>
      table {
        border-collapse: collapse;
        width: 100%;
      }
      th,
      td {
        text-align: left;
        padding: 10px;
      }
      tr:nth-child(even) {
        background-color: #6eeccf;
      }
      tr:nth-child(odd) {
        background-color: #2d7f88;
      }
    </style>
  </head>
  <body>
    <h2>Striped table example</h2>
    <table>
      <thead>
        <tr>
          <th>First name</th>
          <th>Last name</th>
          <th>Points</th>
        </tr>
      </thead>
      <tbody>
        <tr>
          <td>Sherlock</td>
          <td>Holmes</td>
          <td>$250</td>
        </tr>
        <tr>
          <td>John</td>
          <td>Watson</td>
          <td>$350</td>
        </tr>
        <tr>
          <td>Mary</td>
          <td>Watson</td>
          <td>$500</td>
        </tr>
      </tbody>
    </table>
  </body>
</html>Responsive tables
A wide table can overflow narrow screens and break the page layout. To make a table responsive, wrap it in a container element (here a <div>) and apply overflow-x: auto to that container. When the table is wider than the viewport, the container shows a horizontal scrollbar instead of stretching the page — the rows stay intact and the user simply scrolls sideways.
Example of creating a responsive table:
<!DOCTYPE html>
<html>
  <head>
    <title>Title of the document</title>
    <style>
      div {
        overflow-x: auto;
      }
      table {
        border-collapse: collapse;
        width: 100%;
      }
      th,
      td {
        text-align: left;
        padding: 8px 5px;
      }
      tr:nth-child(even) {
        background-color: #6eeccf;
      }
      tr:nth-child(odd) {
        background-color: #2d7f88;
      }
    </style>
  </head>
  <body>
    <h2>Responsive table example</h2>
    <div>
      <table>
        <thead>
          <tr>
            <th>First Name</th>
            <th>Last Name</th>
            <th>Money</th>
            <th>Money</th>
            <th>Money</th>
            <th>Money</th>
            <th>Money</th>
            <th>Money</th>
            <th>Money</th>
            <th>Money</th>
            <th>Money</th>
            <th>Money</th>
          </tr>
        </thead>
        <tbody>
          <tr>
            <td>Sherlock</td>
            <td>Holmes</td>
            <td>$150</td>
            <td>$150</td>
            <td>$150</td>
            <td>$150</td>
            <td>$150</td>
            <td>$150</td>
            <td>$150</td>
            <td>$150</td>
            <td>$150</td>
            <td>$150</td>
          </tr>
          <tr>
            <td>John</td>
            <td>Watson</td>
            <td>$350</td>
            <td>$350</td>
            <td>$350</td>
            <td>$350</td>
            <td>$350</td>
            <td>$350</td>
            <td>$350</td>
            <td>$350</td>
            <td>$350</td>
            <td>$350</td>
          </tr>
          <tr>
            <td>Mary</td>
            <td>Watson</td>
            <td>$500</td>
            <td>$500</td>
            <td>$500</td>
            <td>$500</td>
            <td>$500</td>
            <td>$500</td>
            <td>$500</td>
            <td>$500</td>
            <td>$500</td>
            <td>$500</td>
          </tr>
        </tbody>
      </table>
    </div>
  </body>
</html>Related Topics
- CSS border-collapse — merge or separate cell borders.
- CSS nth-child() — target odd/even rows for zebra striping.
- CSS :hover — highlight the row under the pointer.
- CSS vertical-align — align cell content top, middle, or bottom.
- HTML Tables — the markup these styles apply to.