CSS grid Property
Learn the CSS grid shorthand: syntax, all value forms, fr units, named areas, auto-flow, and practical layout examples with live demos.
The grid CSS property is a shorthand that lets you define an entire CSS Grid layout in a single declaration. It sets the following six sub-properties at once on the grid container:
- grid-template-rows — heights of the explicit rows
- grid-template-columns — widths of the explicit columns
- grid-template-areas — named regions of the layout
- grid-auto-rows — height of implicitly created rows
- grid-auto-columns — width of implicitly created columns
- grid-auto-flow — direction in which auto-placed items are added
The grid property applies only to a grid container — an element with display: grid or display: inline-grid.
Important: Any sub-property you do not mention in a
griddeclaration is reset to its initial value. This is the key difference from setting sub-properties individually —gridalways starts from a clean slate.
Explicit vs. implicit tracks
Understanding this distinction is the key to reading any grid value:
- Explicit tracks are the rows and columns you define by hand. The
/in the value separates rows (left) from columns (right):grid: 100px 200px / 1fr 1frmeans two explicit rows and two explicit columns. - Implicit tracks are extra rows or columns the browser creates automatically when there are more items than the explicit grid can hold.
grid-auto-rows/grid-auto-columnsset their sizes, andgrid-auto-flowdecides whether overflow goes into new rows (the default) or new columns.
You can specify either the explicit properties or the implicit ones in a single grid shorthand — not both at the same time.
The fr unit
Grid layouts frequently use fr (fraction unit). 1fr means "one share of the available space". Three columns defined as 1fr 1fr 1fr each get one-third of the container width. You can also mix fr with fixed sizes: 200px 1fr gives the first column 200 px and the second column all remaining space.
Syntax
/* Keyword */
grid: none;

/* Explicit rows / columns */
grid: <grid-template-rows> / <grid-template-columns>;

/* Template areas */
grid: <grid-template>;

/* Implicit rows, explicit columns */
grid: [ auto-flow && dense? ] <grid-auto-rows>? / <grid-template-columns>;

/* Explicit rows, implicit columns */
grid: <grid-template-rows> / [ auto-flow && dense? ] <grid-auto-columns>?;

/* Global values */
grid: inherit;
grid: initial;
grid: unset;The && notation means both keywords must appear; their order does not matter. The ? means the term is optional.
| Initial Value | none |
|---|---|
| Applies to | Grid containers |
| Inherited | No |
| Animatable | Yes (grid layout is animatable) |
| CSS version | CSS Grid Layout Module Level 1 |
| DOM syntax | element.style.grid = "100px / 1fr 1fr" |
Value forms
| Value | What it does |
|---|---|
none | Removes any explicit template; all sub-properties reset to initial. |
<template-rows> / <template-columns> | Sets explicit row and column tracks. |
<grid-template> | Shorthand for grid-template-rows, grid-template-columns, and grid-template-areas. |
<template-rows> / auto-flow [dense] [<auto-cols>] | Explicit rows; columns are generated automatically. Add dense to back-fill gaps. |
auto-flow [dense] [<auto-rows>] / <template-cols> | Rows are generated automatically; columns are explicit. |
initial | Resets the property to its default value (none). |
inherit | Inherits the computed value from the parent element. |
Examples
Example 1: Basic explicit grid
grid: 100px / auto auto auto creates one explicit row (100 px tall) and three equal auto-width columns. The nine boxes overflow into additional implicit rows (auto-sized):
<!DOCTYPE html>
<html>
  <head>
    <title>Title of the document</title>
    <style>
      .grid-container {
        display: grid;
        grid: 100px / auto auto auto;
        background-color: #ccc;
        padding: 10px;
      }
      .grid-box {
        background-color: #eee;
        border: 1px solid rgba(0, 0, 0, 0.8);
        padding: 30px;
        font-size: 30px;
        text-align: center;
      }
    </style>
  </head>
  <body>
    <h2>Grid property example</h2>
    <div class="grid-container">
      <div class="grid-box">1</div>
      <div class="grid-box">2</div>
      <div class="grid-box">3</div>
      <div class="grid-box">4</div>
      <div class="grid-box">5</div>
      <div class="grid-box">6</div>
      <div class="grid-box">7</div>
      <div class="grid-box">8</div>
      <div class="grid-box">9</div>
    </div>
  </body>
</html>Example 2: Auto-flow into columns
grid: auto auto / auto-flow sets two explicit rows and tells the browser to generate columns automatically as it places items. Each item flows into a new column until all items are placed, filling both rows column by column.
<!DOCTYPE html>
<html>
  <head>
    <title>Title of the document</title>
    <style>
      .grid-container {
        display: grid;
        grid: auto auto / auto-flow;
        gap: 5px;
        background-color: #1c87c9;
        padding: 10px;
      }
      .grid-container > div {
        background-color: rgba(255, 255, 255, 0.8);
        text-align: center;
        padding: 20px 0;
        font-size: 20px;
      }
    </style>
  </head>
  <body>
    <h2>Grid property example</h2>
    <div class="grid-container">
      <div class="grid-box1">1</div>
      <div class="grid-box2">2</div>
      <div class="grid-box3">3</div>
      <div class="grid-box4">4</div>
    </div>
  </body>
</html>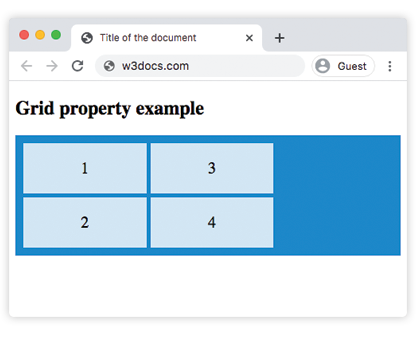
Example 3: Explicit item placement with grid-area
Each box is positioned with grid-area using the row-start / column-start / row-end / column-end syntax on top of a grid: 100px / auto auto auto template:
<!DOCTYPE html>
<html>
  <head>
    <title>Title of the document</title>
    <style>
      .grid-box1 {
        grid-area: 1 / 1 / 2 / 2;
      }
      .grid-box2 {
        grid-area: 1 / 2 / 2 / 3;
      }
      .grid-box3 {
        grid-area: 1 / 3 / 2 / 4;
      }
      .grid-box4 {
        grid-area: 2 / 1 / 3 / 2;
      }
      .grid-box5 {
        grid-area: 2 / 2 / 3 / 3;
      }
      .grid-box6 {
        grid-area: 2 / 3 / 3 / 4;
      }
      .grid-container {
        display: grid;
        grid: 100px / auto auto auto;
        gap: 10px;
        background-color: #1c87c9;
        padding: 10px;
      }
      .grid-container > div {
        background-color: #eee;
        text-align: center;
        padding: 20px 0;
        font-size: 25px;
      }
    </style>
  </head>
  <body>
    <h2>Grid property example</h2>
    <div class="grid-container">
      <div class="grid-box1">1</div>
      <div class="grid-box2">2</div>
      <div class="grid-box3">3</div>
      <div class="grid-box4">4</div>
      <div class="grid-box5">5</div>
      <div class="grid-box6">6</div>
    </div>
  </body>
</html>Example 4: fr units for flexible columns
Using fr units is the most common pattern for responsive grids. The three columns below each take an equal share of the available width and shrink or grow together:
<!DOCTYPE html>
<html>
  <head>
    <title>Title of the document</title>
    <style>
      .grid-container {
        display: grid;
        grid: auto / 1fr 1fr 1fr;
        gap: 10px;
        background-color: #1c87c9;
        padding: 10px;
      }
      .grid-container > div {
        background-color: rgba(255, 255, 255, 0.9);
        text-align: center;
        padding: 20px;
        font-size: 20px;
      }
    </style>
  </head>
  <body>
    <h2>Three equal columns with fr units</h2>
    <div class="grid-container">
      <div>A</div>
      <div>B</div>
      <div>C</div>
      <div>D</div>
      <div>E</div>
      <div>F</div>
    </div>
  </body>
</html>The rule grid: auto / 1fr 1fr 1fr is equivalent to the more verbose:
grid-template-rows: auto;
grid-template-columns: 1fr 1fr 1fr;
/* all other grid sub-properties reset to initial */Example 5: Named template areas
The grid shorthand supports grid-template-areas syntax directly. Each quoted string represents one row; each word inside is an area name. A . (dot) marks an empty cell.
<!DOCTYPE html>
<html>
  <head>
    <title>Title of the document</title>
    <style>
      .layout {
        display: grid;
        grid:
          "header header header" 60px
          "sidebar main   main"  1fr
          "footer footer footer" 40px
          / 160px 1fr 1fr;
        gap: 8px;
        height: 260px;
        background-color: #ccc;
        padding: 8px;
      }
      .header  { grid-area: header;  background: #1c87c9; color: #fff; display: flex; align-items: center; justify-content: center; }
      .sidebar { grid-area: sidebar; background: #8ecae6; display: flex; align-items: center; justify-content: center; }
      .main    { grid-area: main;    background: #eee;    display: flex; align-items: center; justify-content: center; }
      .footer  { grid-area: footer;  background: #023e8a; color: #fff; display: flex; align-items: center; justify-content: center; }
    </style>
  </head>
  <body>
    <div class="layout">
      <div class="header">Header</div>
      <div class="sidebar">Sidebar</div>
      <div class="main">Main content</div>
      <div class="footer">Footer</div>
    </div>
  </body>
</html>The value after each quoted row string (60px, 1fr, 40px) is the row height. The / at the end starts the column-width list (160px 1fr 1fr).
When to use grid vs. grid-template
| Goal | Use |
|---|---|
| Set explicit row/column sizes and named areas only | grid-template |
| Also control auto-placement direction or implicit track sizes | grid |
| Only set column widths | grid-template-columns |
| Only set row heights | grid-template-rows |
Reaching for the narrowest shorthand makes your code easier to scan and avoids accidentally resetting unrelated sub-properties.
Browser support
The grid shorthand is supported in all modern browsers (Chrome 57+, Firefox 52+, Safari 10.1+, Edge 16+). For older environments you may need to set sub-properties individually. Check current support data on Can I use: CSS Grid Layout.
See also
- grid-template — shorthand for template sub-properties only
- grid-template-columns and grid-template-rows — explicit track sizing
- grid-template-areas — naming layout regions
- grid-auto-flow — control how auto-placed items fill the grid
- grid-auto-rows and grid-auto-columns — implicit track sizing
- grid-gap — spacing between rows and columns
- grid-area — place an item by named area or line numbers
- display — the
gridvalue that turns an element into a grid container - align-items and justify-content — alignment within the grid