CSS grid-auto-flow Property
The grid-auto-flow CSS property specifies the auto-placed items flowing into the grid. See examples with different values.
The grid-auto-flow property controls how the grid auto-placement algorithm works — that is, how items that you did not position explicitly get flowed into the grid.
When you place items by hand with grid-column-start, grid-row-start, or grid-area, the browser puts them exactly where you ask. Every other item is auto-placed, and grid-auto-flow decides the order and direction the browser uses to fill the remaining cells. This makes it the property to reach for when you have a grid container with a variable or unknown number of children and want them laid out predictably without sizing each one.
This property accepts the following keywords: row, column, dense, row-dense, and column-dense. You can use a single keyword (row, column, or dense) or two keywords where one sets the direction and the other is dense (row dense / column dense). If you don't specify a direction, row is assumed.
How it works
row(the default) fills the grid one row at a time, left to right, adding new rows as needed.columnfills one column at a time, top to bottom, adding new columns as needed.denseturns on a dense packing algorithm. By default (sparse packing) the algorithm only ever moves forward, so a large item can leave a gap behind it that smaller later items skip over. Withdense, the browser backtracks to fill those holes with any item that fits — which can make items appear out of DOM order. Use it only when visual density matters more than reading/tab order, since it can hurt accessibility.
| Initial Value | row |
|---|---|
| Applies to | Grid containers. |
| Inherited | No. |
| Animatable | No. |
| Version | CSS Grid Layout Module Level 1 |
| DOM Syntax | object.style.gridAutoFlow = "row"; |
Syntax
Syntax of CSS grid-auto-flow Property
grid-auto-flow: row | column | dense | row-dense | column-dense | initial | inherit;Example: grid-auto-flow: column
With grid-auto-flow: column, the four items fill the grid one column at a time. Compare it with the row example that follows to see the difference in placement order.
<!DOCTYPE html>
<html>
  <head>
    <title>Title of the document</title>
    <style>
      .grey-container {
        display: grid;
        grid-template-columns: auto auto auto;
        grid-template-rows: auto auto;
        grid-auto-flow: column;
        gap: 10px;
        background-color: #ccc;
        padding: 10px;
      }
      .grey-container > div {
        background-color: #eee;
        text-align: center;
        padding: 20px 0;
        font-size: 30px;
      }
    </style>
  </head>
  <body>
    <h2>Grid-auto-flow property example</h2>
    <h3>grid-auto-flow: column</h3>
    <div class="grey-container">
      <div>1</div>
      <div>2</div>
      <div>3</div>
      <div>4</div>
    </div>
  </body>
</html>Here, the items are placed by filling each column. In the following example, we can see that the items are placed by filling each row.
Example: grid-auto-flow: row
<!DOCTYPE html>
<html>
  <head>
    <title>Title of the document</title>
    <style>
      .white-container {
        display: grid;
        grid-template-columns: auto auto auto;
        grid-template-rows: auto auto;
        grid-auto-flow: row;
        gap: 10px;
        background-color: #ccc;
        padding: 10px;
      }
      .white-container > div {
        background-color: #fff;
        text-align: center;
        padding: 20px 0;
        font-size: 30px;
      }
    </style>
  </head>
  <body>
    <h2>Grid-auto-flow property example</h2>
    <h3>grid-auto-flow: row</h3>
    <div class="white-container">
      <div>1</div>
      <div>2</div>
      <div>3</div>
      <div>4</div>
    </div>
  </body>
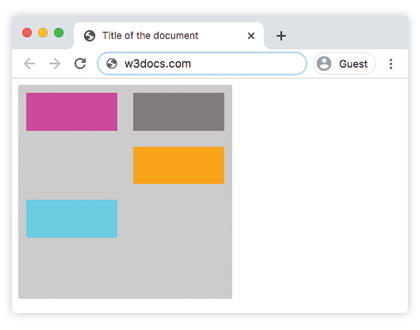
</html>Example: grid-auto-flow: row (with explicit placement)
<!DOCTYPE html>
<html>
  <head>
    <title>Title of the document</title>
    <style>
      .grey-container {
        height: 250px;
        width: 250px;
        display: grid;
        gap: 20px;
        grid-template: repeat(4, 1fr) / repeat(2, 1fr);
        grid-auto-flow: row;
        background-color: #ccc;
        padding: 10px;
      }
      .box1 {
        background-color: #00f3ff;
        grid-row-start: 3;
      }
      .box2 {
        background-color: #ff00d4;
      }
      .box3 {
        background-color: #827c7c;
      }
      .box4 {
        grid-column-start: 2;
        background-color: orange;
      }
    </style>
  </head>
  <body>
    <div class="grey-container">
      <div class="box1"></div>
      <div class="box2"></div>
      <div class="box3"></div>
      <div class="box4"></div>
    </div>
  </body>
</html>Result
Example: grid-auto-flow: column (with explicit placement)
<!DOCTYPE html>
<html>
  <head>
    <title>Title of the document</title>
    <style>
      .grey-container {
        height: 250px;
        width: 250px;
        display: grid;
        gap: 20px;
        grid-template: repeat(4, 1fr) / repeat(2, 1fr);
        grid-auto-flow: column;
        background-color: #ccc;
        padding: 10px;
      }
      .box1 {
        background-color: #00f3ff;
        grid-row-start: 3;
      }
      .box2 {
        background-color: #827c7c;
      }
      .box3 {
        background-color: #ff00d4;
      }
      .box4 {
        grid-column-start: 2;
        background-color: #4cbb13;
      }
    </style>
  </head>
  <body>
    <div class="grey-container">
      <div class="box1"></div>
      <div class="box2"></div>
      <div class="box3"></div>
      <div class="box4"></div>
    </div>
  </body>
</html>Example: grid-auto-flow: column-dense
The next two examples show the dense packing variants. Because box1 is explicitly placed on row 3 (grid-row-start: 3), it leaves a hole near the start of the grid. The dense keyword lets the browser pull a later item back into that hole instead of leaving it empty — compact, but the items no longer follow source order.
<!DOCTYPE html>
<html>
  <head>
    <title>Title of the document</title>
    <style>
      .grey-container {
        height: 250px;
        width: 250px;
        display: grid;
        gap: 20px;
        grid-template: repeat(4, 1fr) / repeat(2, 1fr);
        grid-auto-flow: column-dense;
        background-color: #ccc;
        padding: 10px;
      }
      .box1 {
        background-color: #0ad6e0;
        grid-row-start: 3;
      }
      .box2 {
        background-color: #841c72;
      }
      .box3 {
        background-color: #827c7c;
      }
      .box4 {
        grid-column-start: 2;
        background-color: #4cbb13;
      }
    </style>
  </head>
  <body>
    <div class="grey-container">
      <div class="box1"></div>
      <div class="box2"></div>
      <div class="box3"></div>
      <div class="box4"></div>
    </div>
  </body>
</html>Example: grid-auto-flow: row-dense
<!DOCTYPE html>
<html>
  <head>
    <title>Title of the document</title>
    <style>
      .grey-container {
        height: 250px;
        width: 250px;
        display: grid;
        gap: 20px;
        grid-template: repeat(4, 1fr) / repeat(2, 1fr);
        grid-auto-flow: row-dense;
        background-color: #ccc;
        padding: 10px;
      }
      .box1 {
        background-color: #0ad6e0;
        grid-row-start: 3;
      }
      .box2 {
        background-color: #841c72;
      }
      .box3 {
        background-color: #827c7c;
      }
      .box4 {
        grid-column-start: 2;
        background-color: #4cbb13;
      }
    </style>
  </head>
  <body>
    <div class="grey-container">
      <div class="box1"></div>
      <div class="box2"></div>
      <div class="box3"></div>
      <div class="box4"></div>
    </div>
  </body>
</html>Values
| Value | Description | Play it |
|---|---|---|
| row | Places items by filling each row, adding new rows if necessary. This is the default value of this property. | Play it » |
| column | Places items by filling each column, adding new columns if necessary. | Play it » |
| dense | Place items to fill any holes in the grid, regardless of item size. This may cause auto-placed items to appear out of DOM order. | Play it » |
| row-dense | Places items by filling each row, and fills holes in the grid. | Play it » |
| column-dense | Places items by filling each column, and fills holes in the grid. | Play it » |
| initial | Makes the property use its default value. | |
| inherit | Inherits the property from its parents element. |
When to use it
Reach for grid-auto-flow when the number of grid items is dynamic — a card list, a photo wall, a tag cloud — and you want the browser to place them for you. Switch to column when content should read top-to-bottom before wrapping, and add dense only when filling every gap is more important than keeping items in source order.
The size of the implicitly created tracks is controlled separately by grid-auto-columns and grid-auto-rows. For explicit layouts, see grid-template and the main CSS Grid chapter.