CSS border-image Property
The CSS shorthand border-image property allows specifying an image as the border around an element. See examples and try them yourself.
The shorthand border-image property lets you use an image — or a CSS gradient — as the border of an element, instead of a plain solid line. It is one of the CSS3 properties.
This page covers how the property works (the nine-slice model behind it), the syntax of the shorthand, several runnable examples, and when reaching for border-image makes sense.
How border-image works: the nine-slice model
The trick that makes border-image work is nine-slicing. The browser takes your source image and cuts it with four lines — two horizontal, two vertical — into nine regions:
- 4 corners are placed in the element's four corners and are never stretched or repeated.
- 4 edges (top, right, bottom, left) fill the space between the corners. These are stretched, repeated, rounded, or spaced depending on border-image-repeat.
- 1 middle is discarded by default, so the element's background shows through. Add the
fillkeyword to border-image-slice to keep it.
Where those slice lines fall is controlled by border-image-slice. This model is why a small image of a decorative frame can wrap a box of any size without the corners distorting.
Important:
border-imageonly draws when the element actually has a border. You must give the element aborder-style(or shorthand border) other thannone— for exampleborder: 10px solid transparent;— otherwise nothing appears.
The shorthand and its sub-properties
This shorthand combines several individual border-image properties. Omitted values default to their initial values. See notes for each sub-property below:
- border-image-source - If the value is "none", or if the image cannot be displayed, the border styles will be used.
- border-image-slice - The middle part of the image is treated as fully transparent, unless the "fill" value is set.
- border-image-width - If this property's value is greater than the element's border-width, the border image will extend beyond the padding (and/or content) edge. You also need to know that this property may be specified using one, two, three, or four values.
- border-image-outset - It may be specified using one, two, three, or four values too.
- border-image-repeat - It can be specified by two values. If the second value is omitted, it is assumed to be the same as the first. And when we set only one value, it applies the same behavior on all four sides, if we set two values, the first applies to the top and bottom, the second to the left and right.
| Property | Value |
|---|---|
| Initial Value | none 100% 1 0 stretch |
| Applies to | All elements, except internal table elements when border-collapse is "collapse". It also applies to ::first-letter. |
| Inherited | No |
| Animatable | No |
| Version | CSS3 |
| DOM Syntax | object.style.borderImage = "url(border.png) 30 round" |
Syntax
Syntax of CSS border-image Property
border-image: source slice width outset repeat | initial | inherit;Example of the border-image property:
Example of CSS border-image Property
<!DOCTYPE html>
<html>
  <head>
    <title>The title of the document</title>
    <style>
      .border {
        border: 10px solid transparent;
        padding: 15px;
        border-image: url(/uploads/media/default/0001/01/812bf6a749522b8185c1beee20dd99dd6c6c87da.jpeg) round;
        border-image-slice: 10%;
      }
    </style>
  </head>
  <body>
    <h2>Border-image-slice example</h2>
    <p class="border">border-image: 10% round;</p>
    <p>Here is the original image used:</p>
    <img src="/uploads/media/default/0001/01/812bf6a749522b8185c1beee20dd99dd6c6c87da.jpeg" style="width:50%" />
  </body>
</html>Result
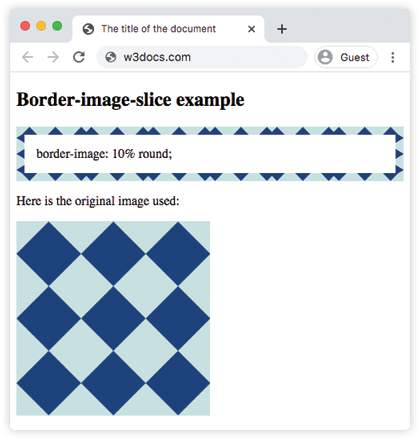
Example of the border-image property with multiple values:
Example of CSS border-image Property with different values
<!DOCTYPE html>
<html>
  <head>
    <title>The title of the document</title>
    <style>
      .border {
        border: 10px solid transparent;
        padding: 15px;
        border-image: url(/uploads/media/default/0001/01/812bf6a749522b8185c1beee20dd99dd6c6c87da.jpeg) round;
        border-image-slice: 30%;
        border-image-repeat: repeat;
        border-image-width: 15px;
      }
      .border2 {
        border: 10px solid transparent;
        padding: 15px;
        border-image: url(/uploads/media/default/0001/01/812bf6a749522b8185c1beee20dd99dd6c6c87da.jpeg) round;
        border-image-slice: 20%;
        border-image-repeat: round;
        border-image-width: 10px;
      }
      .border3 {
        border: 10px solid transparent;
        padding: 15px;
        border-image: url(/uploads/media/default/0001/01/812bf6a749522b8185c1beee20dd99dd6c6c87da.jpeg) round;
        border-image-slice: 15%;
        border-image-repeat: space;
        border-image-width: 20px;
      }
    </style>
  </head>
  <body>
    <h2>Border-image example with all values.</h2>
    <p class="border">border-image: 30% 15px repeat</p>
    <p class="border2">border-image: 20% 10px round;</p>
    <p class="border3">border-image: 15% 20px space;</p>
    <p>Here is the original image used:</p>
    <img src="/uploads/media/default/0001/01/812bf6a749522b8185c1beee20dd99dd6c6c87da.jpeg" style="width:50%" />
  </body>
</html>Using a CSS gradient as the border
border-image-source accepts a gradient as well as a URL, so you can build a colorful border with no image file at all. The gradient is treated exactly like an image and sliced the same way.
<!DOCTYPE html>
<html>
  <head>
    <title>The title of the document</title>
    <style>
      .gradient-border {
        border: 12px solid transparent;
        padding: 15px;
        border-image: linear-gradient(45deg, #1095c1, #f7df1e) 1;
      }
    </style>
  </head>
  <body>
    <p class="gradient-border">A border drawn from a CSS gradient.</p>
  </body>
</html>The 1 after the gradient is the border-image-slice value. Because a gradient has no real edges to protect, slicing it at 1 simply maps the four edges and corners onto the border with no distortion.
When to use border-image
Reach for border-image when a single solid color is not enough:
- Decorative or themed frames — ornate, hand-drawn, or torn-paper borders that would be impossible with
border-style. - Gradient borders — see the example above; far simpler than faking it with a wrapper element and
background-clip. - Repeating patterns — a small tile that wraps any-size boxes thanks to the nine-slice model.
For plain rounded corners use border-radius; for a normal colored line use the standard border shorthand — they are lighter and animatable, while border-image is not.
Values
| Value | Description | Play it |
|---|---|---|
| border-image-source | Specifies the source image that is used to create border image. This can be a URL, data URI, CSS gradient, or inline SVG. | |
| border-image-slice | Specifies how to slice the image specified by border-image-source. The image is always sliced into nine sections: four corners, four edges and the middle. | Play it » |
| border-image-width | Specifies the width of the border image. | |
| border-image-repeat | Specifies if the border image is repeated, rounded or stretched. | Play it » |
| initial | Sets the property to its default value. | |
| inherit | Inherits the property from its parent element. |
Browser support
border-image is supported in all modern browsers (Chrome, Edge, Firefox, Safari, and Opera). Because it gracefully falls back to whatever border-style/border-color you set, you can layer it on top of a normal border as progressive enhancement: older or unsupporting browsers show the plain border, newer ones show the image.