Git Repository
See the definition of Git repository, learn how to initialize & clone it with git init & git clone commands, save changes to the repository & push them.
What is a Git Repository?
A Git repository is the storage for your project files together with the complete history of every change ever made to them. It lets you save versions of your code (commits), move between those versions, and collaborate with others without losing work.
This page covers the whole lifecycle of a repository: creating one, making and saving changes, connecting it to a remote, and sharing your work. Each step links to a dedicated chapter where you can go deeper.
The .git directory
Everything that makes a folder a repository lives in a single hidden subdirectory called .git at the project root. It holds your commit history, branches, tags, configuration, and the staging area. Delete .git and you are left with plain files — the version history is gone. Copy .git along with the files and you have copied the entire repository.
Local vs. remote repositories
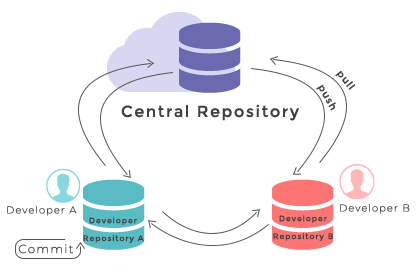
Git is a distributed version control system, so there are two kinds of repository you will work with:
- A local repository lives on your own machine. You commit to it, branch in it, and inspect its history offline — no network needed.
- A remote repository lives on a server (for example GitHub or Bitbucket). It is the shared copy your team pushes to and pulls from.
A typical workflow edits files locally, records them as commits, and then synchronizes those commits with the remote.
Git Init for Initializing a New Repository
Use the git init command to turn an existing folder into a repository. You run it once, when the project does not yet have version control.
git init
git initRunning this inside your project folder creates the hidden .git subdirectory and prints something like:
Initialized empty Git repository in /path/of/project/.git/You can also create the repository in a folder named for you in a single step by passing a directory:
git init directory
git init <directory>This creates the folder (if it does not exist) and initializes an empty Git repository inside it. No branch points to a commit yet; the default branch (usually main or master, depending on your Git version and config) starts existing only after your first commit.
Git Clone for Cloning an Existing Repository
If the project already exists on a remote server, you do not run git init. Instead, use git clone to copy it to your machine. This is also a one-time operation per project.
git clone repo url
git clone <repo url>Cloning downloads the full history and working files, and — unlike git init — automatically configures the source as a remote named origin. That means you can git push and git pull right away with no extra setup.
Git Add and Git Commit for Saving Changes to the Repository
Saving a change is a two-step process in Git. First git add moves changes into the staging area (also called the index) — a holding zone where you choose exactly what goes into the next snapshot. Then git commit records that staged content as a permanent point in the history. Splitting the operation lets you commit only some of your changes at a time.
The flow below creates a file, checks its status, stages it, and commits it:
- change directories to
/path/of/project - create a new file
GitCommit.txtwith the contents "commit example for git repo" - run git status to confirm the new file is untracked
- run
git add GitCommit.txtto move it into the staging area - run
git commitwith a message describing the work done
git add and git commit
cd /path/of/project
echo "commit example for git repo" >> GitCommit.txt
git status
git add GitCommit.txt
git commit -m "added GitCommit.txt to the repo"Run git status at any point to see which files are untracked, staged, or modified. Only files you have explicitly added with git add are included in the next commit. To keep build output, secrets, or dependencies out of the repository entirely, list them in a .gitignore file.
Git Remote Add for Connecting to a Remote Repository
If you created the repository with git init, it has no remote yet. Add one with the git remote command. By convention the primary remote is named origin:
git remote add
git remote add origin <remote_repo_url>Verify the remote was registered before pushing:
git remote -vThis prints the fetch and push URLs for every configured remote, for example:
origin  https://github.com/user/repo.git (fetch)
origin https://github.com/user/repo.git (push)(Repositories created with git clone already have origin set, so you can skip this step.)
Git Push for Repository Interaction
If you used git clone, a remote repository is already configured, so you can run git push to push your changes. If you used git init, you first need to add a remote repository (see above). You can use a hosted Git service like GitHub or Bitbucket, create a repository there, and use the provided URL to connect your local project.
After adding the remote, you can push local branches to it:
git push
git push -u origin mainThe -u (short for --set-upstream) option does two things: it pushes your changes and it links your local branch to the remote one. After that link is set, you can run plain git push and git pull without naming the remote or branch every time.
Git Config for Configuration and Setup
Before your first commit, Git needs to know who you are. The git config command sets options that control user identity, preferences, and repository behavior. The settings live at three scopes, each overriding the broader one.
Use the --global flag to set options for the current user. These apply to every repository you own, which is the right scope for your name and email:
git repository, git config global user.name
git config --global user.name <name>
git config --global user.email <email>Use --local (the default when you omit a scope flag) to set an option only for the current repository. This is handy when one project needs a different identity from your global default:
git repository, git config local user.email
git config --local user.email <email>Use --system to set configuration for every user and repository on the machine — for example a shared default editor:
git config system editor
git config --system core.editor <editor>When the same key is set at more than one scope, local wins over global, and global wins over system, so a per-repository value always takes precedence.
Putting It All Together
For a brand-new project that you want to share, the full sequence is:
git init
git config --global user.name "Your Name"
git config --global user.email "[email protected]"
echo "# My Project" >> README.md
git add README.md
git commit -m "Initial commit"
git remote add origin <remote_repo_url>
git push -u origin mainIf the project already exists on a remote instead, you skip git init and git remote add — git clone <repo url> gives you a ready-to-use repository in one command.
From here, dig into the individual commands: git add and git commit for saving work, git status for inspecting it, and git push / git pull for syncing with the remote.