Feature branch workflow
Learn the feature branch workflow — develop each change on its own branch and merge it back to main through review. Step-by-step example.
Overview
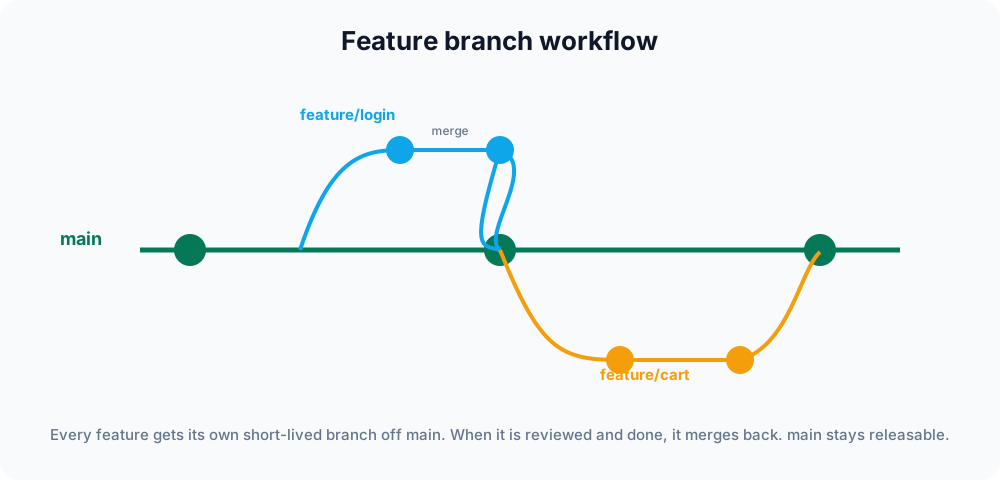
The feature branch workflow is the most common way teams collaborate with Git. The rule is simple: all development happens on dedicated branches, never directly on main. Each new feature, fix, or experiment gets its own branch, and the main branch only ever receives finished, reviewed work. This keeps main stable and releasable at all times.
The core idea
Because work is isolated on branches, several people can build different features in parallel without interfering. main acts as the single source of truth for production-ready code. A branch is a focused unit of work that has a clear beginning (created from main) and a clear end (merged back into main).
Crucially, a branch in Git is cheap: it is just a movable pointer to a commit, not a copy of your files. Creating one is instant and uses almost no disk space, which is exactly why making a branch per task is practical.
Naming branches
A consistent naming scheme makes branches self-documenting. Most teams prefix the branch with its type and reference the task being worked on:
feature/login-form
feature/W3-142-checkout-page
fix/null-pointer-on-logout
chore/upgrade-eslintThe slash is just a convention — Git treats feature/login-form as a single branch name, though it does let tools group branches by prefix. Avoid spaces and uppercase to keep names easy to type.
A step-by-step example
The workflow is a short, repeatable loop: branch off main, work, push, review, merge, clean up.
1. Create the branch from an up-to-date main
Always start from the latest main so your branch is based on current code:
git switch main
git pull
git switch -c feature/login-formgit switch -c creates the branch and checks it out in one step (the older equivalent is git checkout -b). See git switch for the full command.
2. Do the work, committing as you go
Commit in small, logical steps rather than one giant commit at the end — small commits are easier to review and to undo:
git add login.html login.js
git commit -m "Add login form markup and validation"Prefer staging specific files over git add . so you do not accidentally commit unrelated changes. Read more about crafting good commits in git commit.
3. Push the branch
Push so teammates can see your work and so you can open a pull request. The -u flag links your local branch to the remote one, so later you can just type git push:
git push -u origin feature/login-formSee git push for what -u (--set-upstream) does in detail.
Review and merge
On a hosting platform such as GitHub or GitLab, you open a pull request (PR), called a merge request on GitLab. This is where teammates review the diff, leave comments, and approve. Continuous-integration (CI) checks typically run the test suite against the branch automatically. Once the PR is approved and the checks are green, the branch is merged into main.
There are three common merge strategies offered by these platforms:
- Merge commit — preserves every commit on the branch plus a merge commit. Keeps full history but can be noisy.
- Squash and merge — collapses all branch commits into one tidy commit on main. Popular because main stays clean and each feature is a single entry.
- Rebase and merge — replays the branch commits onto main with no merge commit, giving a linear history.
Clean up after merging
Once the branch is merged, delete it locally and remotely so the repository does not fill up with stale branches:
git switch main
git pull
git branch -d feature/login-form        # delete the local branch
git push origin --delete feature/login-form # delete the remote branchgit branch -d refuses to delete a branch that has not been merged, which protects you from losing work. (Use -D to force deletion when you are sure.)
Keeping a branch current
If main moves ahead while you work, bring those changes into your branch so the eventual merge is smooth and conflicts surface early. You have two options:
# Option A — merge main into your branch (keeps history as-is)
git switch feature/login-form
git merge main

# Option B — rebase your branch onto the latest main (linear history)
git switch feature/login-form
git rebase mainMerging is non-destructive and safe for shared branches, but adds merge commits. Rebasing produces a cleaner, linear history but rewrites your branch's commits — so avoid rebasing a branch that others have already pulled. The rule of thumb: rebase your own private branch, merge anything shared.
Handling conflicts
When two branches change the same lines, the merge or rebase stops and asks you to resolve the conflict. Git marks the clashing regions in the affected files; you edit them, then stage and continue. The full process is covered in Resolving merge conflicts.
Saving work in progress
If you need to switch branches but are not ready to commit, git stash shelves your uncommitted changes so you can move freely and restore them later:
git stash            # set current changes aside
git switch main      # do something urgent
git switch feature/login-form
git stash pop # bring the changes backBenefits and trade-offs
The feature branch workflow is popular because it is easy to understand, integrates naturally with pull requests and code review, and keeps main releasable at all times.
Its main risk is long-lived branches: the longer a branch lives, the more it diverges from main and the harder the eventual merge ("merge hell"). To avoid that:
- Keep branches small and short-lived — ideally merged within a day or two.
- Pull main into your branch (or rebase) regularly, not just at the end.
- Split large features into several smaller branches that each merge independently.
- Never commit directly to main — that defeats the purpose of the workflow.
When teams need release branches, hotfix branches, and a strict promotion process on top of this, they often adopt a fuller model such as Git Flow or trunk-based development — but the feature branch is the building block underneath all of them.